Saturday, January 30, 2010

3 and a half Dog Night

Our dogs have made cameo appearances in this blog but I think it's time they came front and center. Today we had a rare snow event which always brings out great photo ops.


The yellow dog is Nickel and the white dog is Dollar. Dollar showed up on our doorstep shortly after we moved to this farm. She was sitting on our porch holding her paw up. Jason took one look at her and said "This is going to cost us 500 dollars" So this is why we call her Dollar. It turned out to be just a cut on her paw and she was fine. She is 5 years old, some type of pointer/hunting dog. She loves her Nickel.


Nickel showed up about a year later. He wandered in from a home down the road that had way too many dogs. They said he was smart to leave and we could have him if we wanted him. He's a goofy dog and it took him awhile to control his goofiness. He used to treat the kids like bowling pins, he would just run up and wipe them out. He can control himself much better now. He loves to sit at your feet and lean on you. He is 4 years old, a lab/pit/great dane? mix. We stuck with the money theme when we named him. Jason jokes that he is worth about a nickel (but he loves him). Nickel loves his Dollar.


This is Penny, it was not hard to come up with a name for her. We adopted her about 2 years ago. She is probably about 3-4 years old and is probably a Wheaton Terrier mix. About 6 weeks after we got her, she surprised us with a litter of puppies. That was fun and was a great experience for the kids. She likes to sleep in this little nest that the kids made for her on the porch out of miscellaneous porch furniture.


Um, ah-hem. Can you see what doesn't belong in this picture? Don't tell Roosty but he is not actually a dog. Shhh. We just play along with his masquerade to pacify him. He actually has grand visions of being an inside dog, which I'm sorry to say is not going to happen. He does his part as a guard rooster though, when they bark, he crows. So at least he plays the part well.


We finally coaxed the dogs off the porch.
Penny is a snow dog. She was wild!


All that thick hair comes off every summer.
We shave her ourselves which is really, really fun (NOT).


And finally some good shots of Nickel. He's such a good dog.


Thursday, January 28, 2010

A Glimpse into our Wild Nightlife

I am so excited to share some pictures we got today of the wildlife on our farm. These are not prize winning quality photographs but the content is very interesting! We have some friends who are interested in hunting on our property, so they set up cameras to scope out our active wildlife.

I'm not sure how I feel about hunters using cameras. At first I thought it was cheating, but now I've come to terms with the idea that it is just a way to scope out a good spot. It's not like the hunters are sitting in a cozy house watching until they see something and then running out to shoot it. Now that is where I would draw the line and say it is cheating, because a key part of hunting is the waiting for something to wander up (let me stop to say that I have never hunted nor ever want to hunt). So as long as the camera is used only to pre-screen a good spot, it isn't a rule violation in my book. If I had a hunting rule book, that is. Which I don't. But if I did, I'd be a stickler to the rules.

Anyway, I am so excited about the pictures they got! We've always thought we had these critters on our farm but have never laid eyes on them. The only thing not in these pictures that we have are beavers, wild turkey, 1000's of rabbits and snakes.


The beaver leave their evidence in other ways, like damming up our creeks and flooding our property. I have to admit that we did see one beaver yesterday after a successful hunting trip by Nickel our dog (RIP Mr. or Mrs. beaver) and he didn't even use cameras! Knowing Nickel though he probably just happened upon an already deceased beaver and got lucky. He was nice enough to bring it right up to our front yard, so all of our riding lesson students and their parents could see yesterday. He's such a good dog (and good for business!)

Anyway, here are the pictures.

This is not a dog. It is a coyote. Probably more than one in these shots as they live in packs.


Look very carefully at these next pictures.
There are 4 maybe 5 dark creatures in this picture.


They are wild hogs. We have seen evidence of them and they tear our dogs up but we have never seen one...until now. They said they got lots and lots of hog pictures so there is no telling how many are out there.

The story has it that awhile back, a local hog farmer died and left his hogs to his daughter. She didn't know what to do with them so she turned them loose. Hogs were running rampant around the woods and farms in the area, but they were domestic hogs so were nothing more than a nuisance. The county wanted to get rid of them but couldn't catch them all, so they decided to import Black Russian Boars that are known to kill everything they come across. The local people asked about cross breeding and the county assured them that they would kill before they bred. Well guess what? We now have a strong population of domestic hogs crossed with Black Russian Boar in our woods. This resulted in an even larger mean boar. When our dogs tangle with them, their tusks usually do some serious damage. Luckily the dogs seem to have learned to keep their distance.

This is obviously a large male Boar. Sorry for the indecent picture, Mr. Boar. I hope you don't have any political aspirations.

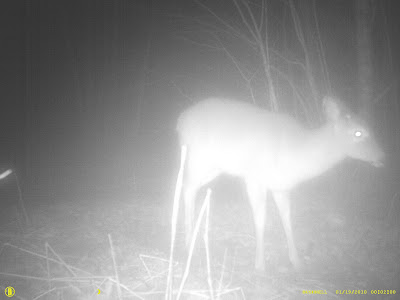
And finally something that is not a predator, a deer, which we really don't see too many of. This is a young buck. I'm glad he made it through deer hunting season.

This is obviously a rare glow in the dark deer from outer space. Who knew we had them too?!

I hope you have enjoyed this glimpse into what roams our farm after dark. I know we did. Oh and these shots were taken only about 60 yards from the edge of our horse pasture. Jason made fun of me when I insisted on putting up woven wire fence around our pasture that nothing can get through. He calls it wombat fence (as in it will keep wombats out) Now I'm so glad we did!

Wednesday, January 20, 2010

Spaghetti's Cousin Twice Removed

My son loves gardening, so when I saw a spaghetti squash at a local farmer's market last summer, I had to get it to show him this magical vegetable that turns into something resembling something else he actually eats. I thought there was hope of getting a vegetable into him without a fight. He had a great time making it but wasn't about to eat any of it. Oh well, I tried. Of all the kids and teachers in the entire 1st grade, he was the only one who knew what a spaghetti squash was on a field trip this fall, so it wasn't all a loss.

Anyway, here's a simple way to make this vegetable that tastes really good.

First cut your squashes in half and remove the seeds and stringy parts.
Then place them in the oven at 350 for about 45 minutes or until they are fork tender (on the inside).


Now comes the fun part.

Take a fork and shred the inside flesh of the squash.

It will easily turn into spaghetti like strands.

It's amazing. I don't understand how it works, it just does.

It's one of those things you just have to take it for what it is and don't ask questions.


Now add your favorite spaghetti sauce and some parmesan cheese.

It would also good with some added vegetables like zucchini, if that's not squash overload for you.


Go ahead. Try something new.

Impress your friends and family with a magic vegetable dish.

Thursday, January 7, 2010

Jambalaya Grits

I got a hankerin' for Jambalaya last night and I actually had the ingredients that I needed that I don't normally have on hand: chicken, smoked sausage, a green pepper. When I started gathering everything together, I realized that I didn't have any rice, which is something I usually always have on hand. Go figure.

I wasn't about to give up though. I searched and searched my pantry for anything I could possibly substitute and I settled on grits. What the heck, I thought, let's give it a try.


It was so good I was looking forward to eating the leftovers the next day as soon as we finished our meal. Jambalaya usually tastes even better the next day so I couldn't hardly wait. Even if you don't like grits, which I normally don't, you should try this. This would also be excellent with shrimp.


First chop up a green pepper and a medium onion.


In a large pot, fry the peppers and onion in a couple tablespoons of oil
until the onions become translucent.


Grab your grits and some Cajun jambalaya seasoning. I used to mix up my own jambalaya seasoning, until one time I accidentally switched the paprika and the cayenne pepper measurements and made molten jambalaya that was inedible it was so hot. So now I buy the premixed stuff and it is just as good.

Add about 2 Tablespoons of the seasoning.

Add 1 cup of grits. Stir and cook the grits for a few minutes until
they are thoroughly coated with seasoning and are slightly toasted.


Now grab some chicken broth and a 14.5 oz can of diced tomatoes.

Add 3 cups of broth and the can of tomatoes to the pot.

Cover and cook on medium low for about 5 minutes if you used quick grits.
Otherwise follow the instructions on your grits package.


Shred about 1 pound of chicken or about 2-3 cups. Chop up 1 package of smoked sausage into bite sized pieces. I use lowfat turkey sausage.

Add the chicken and the sausage to the pot and stir to combine it all.
Cook for another 5 minutes or until heated through.


Here is the final product. Yum.


Jambalaya Grits

2 T canola or olive oil
1 med green pepper, diced
1 med onion, diced
2-3 T Jambalaya seasoning
1 cup quick cooking grits
3 cups chicken broth
1 14.5oz can diced tomatoes
2-3 cups shredded cooked chicken
1 package smoked turkey sausage, cut into bite size pieces

In a large pot, stir fry pepper and onion in oil until onion is translucent. Add seasoning and grits. Cook and stir for 5 minutes or until grits are thoroughly coated with seasoning and are slightly toasted. Add broth and tomatoes. Cover and cook on medium low heat for 5 minutes. Add chicken and sausage. Stir and cook for 5 minutes until heated through.

Tuesday, January 5, 2010

Fried Mac & Cheese

Make no mistake. This recipe should not factor into anyone's New Year's resolutions. Unless you resolved to eat great tasting, bad for you food all year. One of my resolutions this year is to find the perfect homemade macaroni and cheese recipe, equivalent to the mac and cheese served at one of my favorite restaurants, Mike's Tree Farm restaurant near Jacksonville, NC. As soon as I figure it out, I will post it here. In the meantime, here is something I like to do with leftover mac & cheese, only once in a blue moon, since there is not one thing healthy about this recipe. Lucky for us there was a blue moon last week.

First, take your leftover homemade mac and cheese that's been chillin' in the fridge for a day or so until it's nice and solid and slice it into slices about 1/2" thick.

Put some breadcrumbs in one bowl, and some milk in another bowl.


Coat the mac & cheese slices in the milk and then roll them in the breadcrumbs until they are thoroughly coated.


Fry them in a skillet with about 1/8" of oil until golden brown on the outside and warm and gooey on the inside.


Remove to a paper towel lined plate and serve.


I'm not sure when the next blue moon will be but go ahead and try this the next time you have mac & cheese in your fridge and need to boost your family's cholesterol numbers. They will love you for it.

Sunday, January 3, 2010

Team Roping Hiser Style

Santa brought the kids new ropes and a practice steer head this year. I always knew Santa was a cowboy. It was way too cold (by NC standards) to practice outside so we set up inside our shop (please disregard any unidentifiable stuff you see laying around).

Casey got a pretty pink rope. The picture below is cool, see the halo effect on the rope? I'm not sure why the halo is ahead of the rope and not behind it? Unless she had some kind of wicked lasso effect going on.

JW's turn. I thought it was interesting that both kids and the steer have the same color eyes in this shot. Spooky.

Get along little doggy!


Future rodeo stars, I'm sure of it.

Friday, January 1, 2010

The Easiest/Hardest/Yummiest Cinnamon Buns You Will Ever Make

My family has been making these cinnamon buns for over 10 years. We make them whenever a crowd is gathered for breakfast, always at Christmas and always on beach trips. The recipe is easy but there have only been a few times we have made this recipe without any problems. As I describe the steps I will also describe each way this recipe has taken a wrong turn to try to keep you out of the pitfalls we have found throughout the years. We keep making them because they are definitely worth it!

Step 1. The night before, melt 1 stick of butter in a saucepan. Don't walk away from the pan while occupied with other steps of the recipe, because butter will burn and turn brown. Been there. If this happens, repeat step 1, unless of course you used your last stick of butter on the first try, then you will need to go to the store, and good luck finding a store open on Christmas eve or at 10pm at the beach.


Step 2. Add 1 cup of brown sugar. This is usually a safe step, unless you underestimated the amount of brown sugar you have in your pantry or forgot to bring it to the beach. If so, see the "Go to Store" part of step 1.


Step 3. Add one 3 oz box of COOK & SERVE vanilla pudding. I repeat COOK & SERVE vanilla pudding, NOT instant! Trying to satisfy our instant gratification society, the grocery store will try to throw you off course by hiding the cook & serve vanilla someplace off to the side. Choose wisely, or risk going to the "Go to Store" part of step 1. Also make sure that it is the 3oz box, not the bigger box, because it is very hard to try to divide it into 3oz, believe me I've tried.


Step 4. Add 2 teaspoons cinnamon. You're pretty safe here, provided you've checked your pantry supplies and remembered to bring it to the beach.


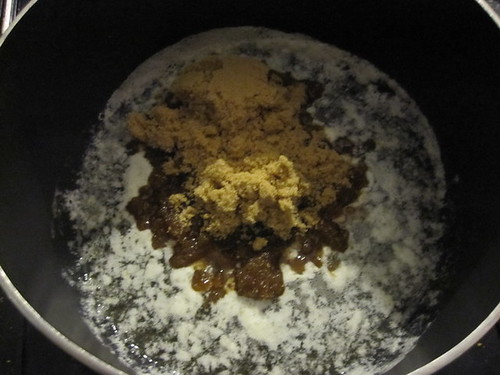
Step 5. Pretend like you can see me adding 3 tablesp0ons of milk in one of these pictures. Stir everything together to make caramel colored yumminess. DO NOT add the pudding while waiting for your family member to go to the store to get the brown sugar you forgot to bring to the beach. By the time they return, you will have a gloppy mess. This will cause you to have to return to the store to get more pudding because you waited until the very last night at the beach to make these and by this time it will be midnight and nobody will be happy.


Step 6. Earlier in the day, lay out 1 package of frozen roll dough to thaw (I use Rich's brand). If you forget to do this, and you probably will if you are anything like me, you can put the rolls in a slightly warm oven to speed the thawing process. Not too long though we don't want dinner rolls here.


Step 7. Spray a 13x9 inch pan with cooking spray. Spray well now, sticky buns should stick to your fingers not the pan!! If the toppings/sauce separates from the bread, there is no recovery. Trying to scrape the toppings out of the pan to add back to the buns does not work!

Sprinkle in nuts or raisins. We're not partial to raisins, and we have one family member who does not like nuts, so you can see below he has his own designated corner.

Step 8. Break the rolls apart into walnut size pieces and add them to the pan in a uniformly random fashion.


Step 8. Pour the sauce all over the pan.


Step 9. Cover the pan with plastic wrap and put them in the fridge overnight. They are supposed to rise to the top of the pan by morning. I will save you some grief and can tell you not to panic if they don't rise. They very rarely rise all the way and it depends alot on the temperature of your fridge. If you are the first one up and have some time, sit them out on the counter for awhile, or put them in a slightly warm oven or just go to step 10. It's all good.

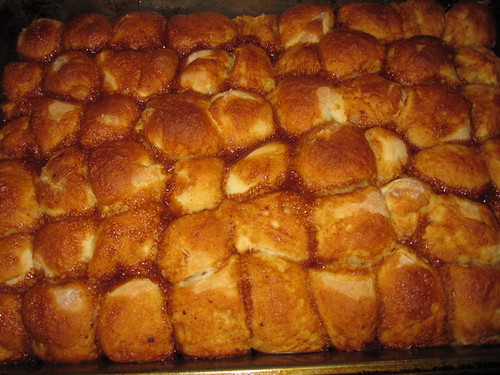
The picture below shows how well ours rose this Christmas (not very well).

Step 10. Bake in a 350 degree oven for 30 minutes. Make sure the oven is on bake not broil. On a beach trip not long after we were married, I put the buns in the oven which I didn't realize was set on broil (you had to set the temp separate from the bake/broil options and I just assumed it was on bake). I told Jason to keep an eye on them and to take them out when the timer went off and then I went to take a shower. Obviously it was the beginning of our marriage because he did exactly what he was told. He kept an eye on them sure enough. Even as they started to burn, he kept an eye on them and did not take them out until the timer went off. Blackened cinnamon buns and a smoky beach house are no fun at all.

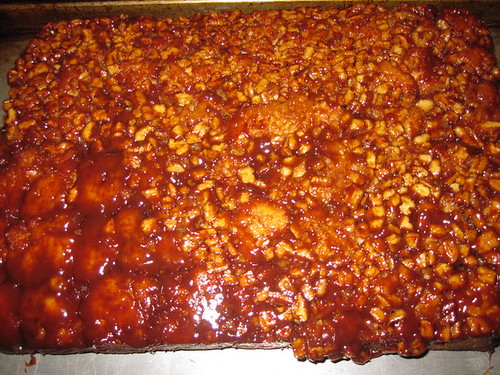
Here's what they should look like:

Step 11. Place a cookie sheet on top of the pan and then flip over. Hopefully if you paid attention to step 7, they will come right out of the pan.


Yum! These make my mouth water just looking at the pictures! When's the next special occasion? President's day?

Here is the recipe that you can copy/paste:

1/2 cup (1 stick) butter
1 cup brown sugar
1 3oz package Cook & Serve Vanilla pudding
2 teaspoons Cinnamon
3 Tablespoons milk
1 package Rich's frozen roll dough, thawed
Chopped pecans (optional)
Raisins (optional)

In a medium saucepan, melt the butter. Add the next 4 ingredients and mix well. Sprinkle nuts/raisins if desired in a 13x9 inch pan coated with cooking spray. Break the rolls into walnut size pieces and place evenly into pan. Pour cinnamon sauce over rolls. Cover pan with plastic wrap and place in the refrigerator overnight. Rolls should rise to top of pan. Bake at 350 for 30 minutes. Invert onto baking sheet.